How to Create Your Personalized Magazine Cover Headlines
by: admin, 05/13/2009 - 20:23
The process of making a personalize magazine cover is really fun - not only will the recipient love this unique photo gift but you will have a great time being creative and giving a truly unique personalized gift. The heart of this personlization is in the headlines, below we explain how to craft these custom text areas...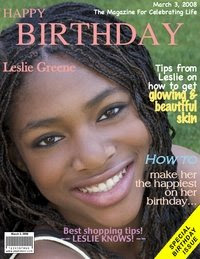
Now to the best part of your creating a magazine cover...the headlines. This is where you can get really creative with your wording, text color, and fonts.
Under Step #4 (Insert Copy) in the magazine cover creation process is where the fun begins. Each text box is higlighted with a yellow line, don't worry, you will not see this line on your finished product. It is only for you to be able to click on & edit, and to know where each headline is placed.
LET'S GET STARTED:
1) After you have chosen your magazine cover template, you will come to Step #4 (Insert Copy). Click on any yellow lined box, & you will notice that the default text will show up in the box next to your your magazine. This box is for you to enter and edit your personalized magazine cover headlines.
2) Take a look at Leslie Greene's magazine cover above as an example: the creator clicked on each yellow lined box and revised each headline so that it was specifically about Leslie.
3) Let's look at the title, it is for Leslie's Birthday.
1) If you move your arrow over each yellow lined box without clicking on them, you will notice that each box is named. For instance, the box underneath the title on the right is called row3right, and the one under that is called row4right. Depending on which magazine cover template you are using, each box has its own name.
2) For Leslie's case, we are going to use headline, "Tips from Leslie on how to get glowing & beautiful skin." This headline was split between row3right, and row4right.
3) "Tips from Leslie on how to get..." was put in box row3right (the box underneath the title on the right). The creator pressed enter 2 times to bring the beginning of the headline down, and made this font Chalkboard and White, and of course clicked UPDATE!
4) "...glowing & beautiful skin" was put in box row4right, and the creator did not need to press enter because "glowing & beautiful skin" was right at the beginning of the box, and fit perfectly underneath the first part of the phrase.
5) The phrase was then updated to the Marker Felt font and Yellow. It was made to a different color and font from the first to emphasis "GLOWING & BEAUTIFUL SKIN."
If you liked the way Leslie's magazine cover turned out, and want to create this style in your own, remember to:
Emphasize, a different color, brighter and bigger font from the part of the phrase you are seperating it from. Another one of Leslie's headlines "HOW TO make her the happiest on her birthday," is another example of how to make your headline stand out and resemble real magazine covers. Pick up a magazine, and take a look at the cover. Try to emulate Sports Illustrated, ELLE, Better Homes & Gardens, or any of your favorite magazines to make it look like it's for real. Play around with it because you will definitely have fun and bring out your creative side. Once you're done putting in all your personalized hard work, everyone will LOVE it!

Now to the best part of your creating a magazine cover...the headlines. This is where you can get really creative with your wording, text color, and fonts.
Under Step #4 (Insert Copy) in the magazine cover creation process is where the fun begins. Each text box is higlighted with a yellow line, don't worry, you will not see this line on your finished product. It is only for you to be able to click on & edit, and to know where each headline is placed.
LET'S GET STARTED:
1) After you have chosen your magazine cover template, you will come to Step #4 (Insert Copy). Click on any yellow lined box, & you will notice that the default text will show up in the box next to your your magazine. This box is for you to enter and edit your personalized magazine cover headlines.
2) Take a look at Leslie Greene's magazine cover above as an example: the creator clicked on each yellow lined box and revised each headline so that it was specifically about Leslie.
3) Let's look at the title, it is for Leslie's Birthday.
- The title boxed was clicked on
- Birthday was typed in
- Font was adjusted to Times
- The color was adjusted to Pink
4) For the magazine cover design system to accept these changes, UPDATE MUST BE CLICKED ON AFTER EACH CHANGE IS MADE! After each edit , click on update for your changes to be valid :o)
How To Make Your Make Your Personalized Magazine Cover Look Like a Real Magazine Cover ...1) If you move your arrow over each yellow lined box without clicking on them, you will notice that each box is named. For instance, the box underneath the title on the right is called row3right, and the one under that is called row4right. Depending on which magazine cover template you are using, each box has its own name.
2) For Leslie's case, we are going to use headline, "Tips from Leslie on how to get glowing & beautiful skin." This headline was split between row3right, and row4right.
3) "Tips from Leslie on how to get..." was put in box row3right (the box underneath the title on the right). The creator pressed enter 2 times to bring the beginning of the headline down, and made this font Chalkboard and White, and of course clicked UPDATE!
4) "...glowing & beautiful skin" was put in box row4right, and the creator did not need to press enter because "glowing & beautiful skin" was right at the beginning of the box, and fit perfectly underneath the first part of the phrase.
5) The phrase was then updated to the Marker Felt font and Yellow. It was made to a different color and font from the first to emphasis "GLOWING & BEAUTIFUL SKIN."
If you liked the way Leslie's magazine cover turned out, and want to create this style in your own, remember to:
Emphasize, a different color, brighter and bigger font from the part of the phrase you are seperating it from. Another one of Leslie's headlines "HOW TO make her the happiest on her birthday," is another example of how to make your headline stand out and resemble real magazine covers. Pick up a magazine, and take a look at the cover. Try to emulate Sports Illustrated, ELLE, Better Homes & Gardens, or any of your favorite magazines to make it look like it's for real. Play around with it because you will definitely have fun and bring out your creative side. Once you're done putting in all your personalized hard work, everyone will LOVE it!
category:
- Log in or register to post comments